How I styled my Honda Transalp XL600V with Plasti Dip and LED lights
Here’s how I styled my Honda Transalp XL600V from 1992 by painting it with Plasti Dip and upgrading it with cool LED lights. Follow me!
This is vacation time, so here’s a post on what I do on my free time. I just re-painted and styled my motorcycle, a 1992 Honda Transalp XL600V.
It’s original lacquer was in a good condition, but it was purple. Hopelessly outdated! So I knew from start I had to re-paint it. However, tired from intensive work this spring, I did not look forward to the surface preparing before the paint work.
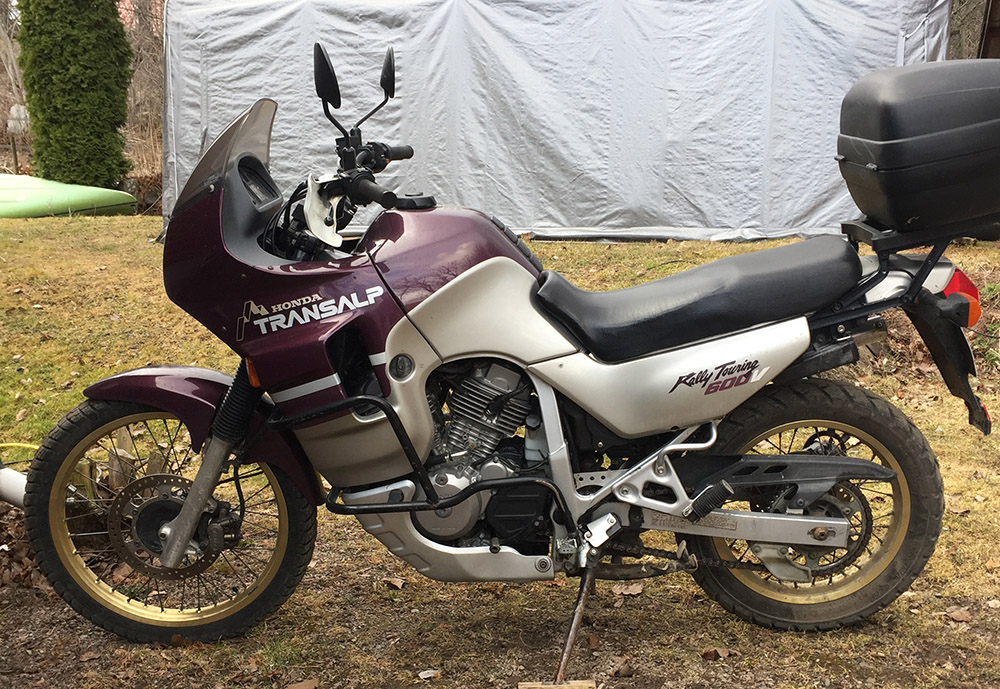
Before I started: Purple/Silver Honda Transalp XL600V 1992 – Click for larger image
Also, I was not sure about what color I wanted.
So I spent quite some time googling Transalp paint works.
Doing that, I found a guy that had painted his Transalp with Plasti Dip. I had heard of Plasti Dip years ago, but then it was about dipping tools in a bucket of color to give them rubber handles. I was not aware of the trend of Plasti Dipping cars, rims and motorcycles.
I was thrilled when I realized that with Plasti Dip, I would not need to do the underwork before painting, and that if I was not happy with the color, I could just rip the rubber paint of and paint it again in another color!
Perfect! Just the kick I needed to get started with the styling of my Transalp!
Or actually, I had already started the styling with replacing the dull original halogen headlight with a cool LED headlight. But led me come back to that later.
I chose to go with the color called Gun Metal Grey. I was thinking about going with the anthracite grey because it seemed lighter from what I could see on the web, but the agent informed me that Gun Metal Grey is the lightest of the three available grey tones of Plasti Dip. Also, Gun Metal Grey was the only one available at my local dealer.
Underwork
I removed all the original stickers heating it with a hairdryer. The hardest one to remove was the sticker with warning texts just behind the fuel cap. Unfortunately, there was quite some rust under that one, so I had to sand that area and paint it with primer and some random color lacquer that I had around, since you shouldn’t use Plasti Dip directly on primer.
Spraying
I removed all cowls including the instrument panel cowl and painted them in my basement with the spray can version of Plasti Dip.
I found it very thick to work with, until I read somewhere that you should warm the can in warm water before spraying. I wasted 1-2 cans before I learned this. I guess I could have finished the whole motorcycle with 4 cans if I had known this from the beginning.
When I had removed the front fender, there was no wind and no direct sunlight outside, so I decided to try spraying it outside. It worked well, so I let the fuel tank remain on the bike and sprayed it where it was, while praying that no flies or mosquitoes would decide to land on it. My prayers were heard and the result was perfect!
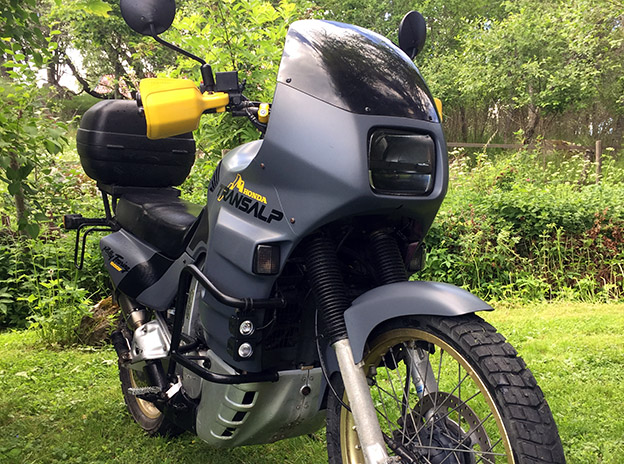
I ended up spraying each surface 3-5 times. Here’s the result (the photo is taken late evening so it seems more bluish than what it is).
My Honda Transalp XL600V 1992 after Plasti Dipping it with Gun Metal Grey. Read about the DRLs here and the LED headlight here
Adding black contrast and protection
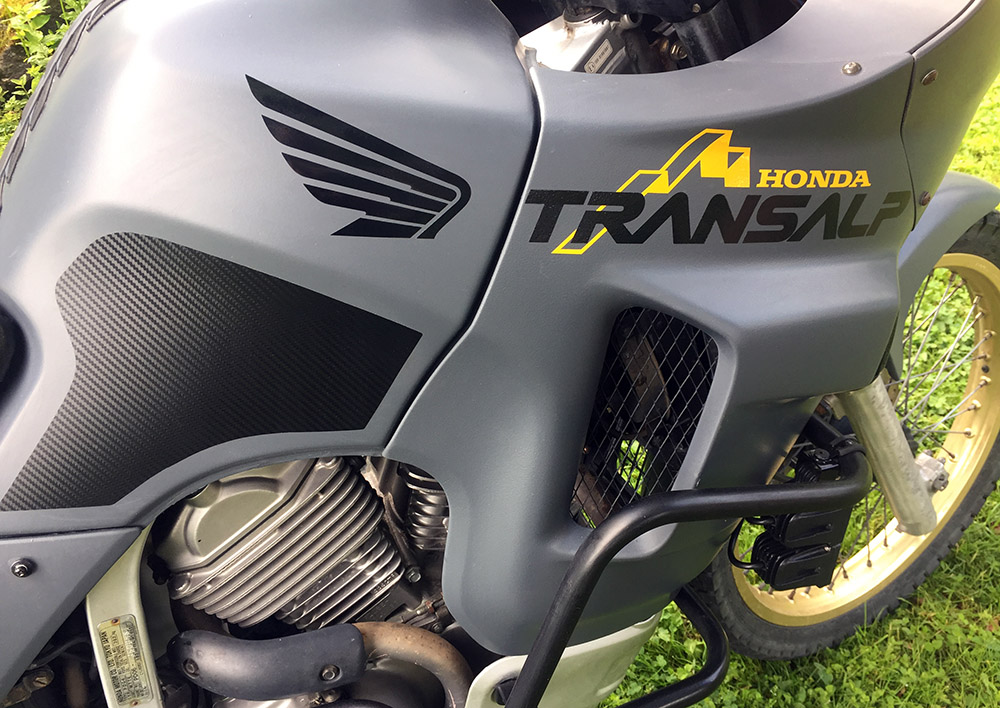
Okay, I was happy with the color, but figured it would be nice to add some black contrast to it. Since the Plasti Dip rubber color is not very durable, I decided to buy some adhesive carbon fiber film on the areas on the side of the tank where my knees will rub and on the rear side cowls where the passengers knees will rub.
New stickers
I ordered new custom Transalp stickers from eShop-stickers.com, where you can choose what colors you want. I went with their 1994-99 set, with black as main color with “yellow bee” as secondary color. I received the new decals within a week. I followed their instructions but found it quite difficult to remove the application tape without removing the sticker. But finally I got everything in place without air bubbles.
New stickers attached and carbon fiber protection film where my knees robs against the tank
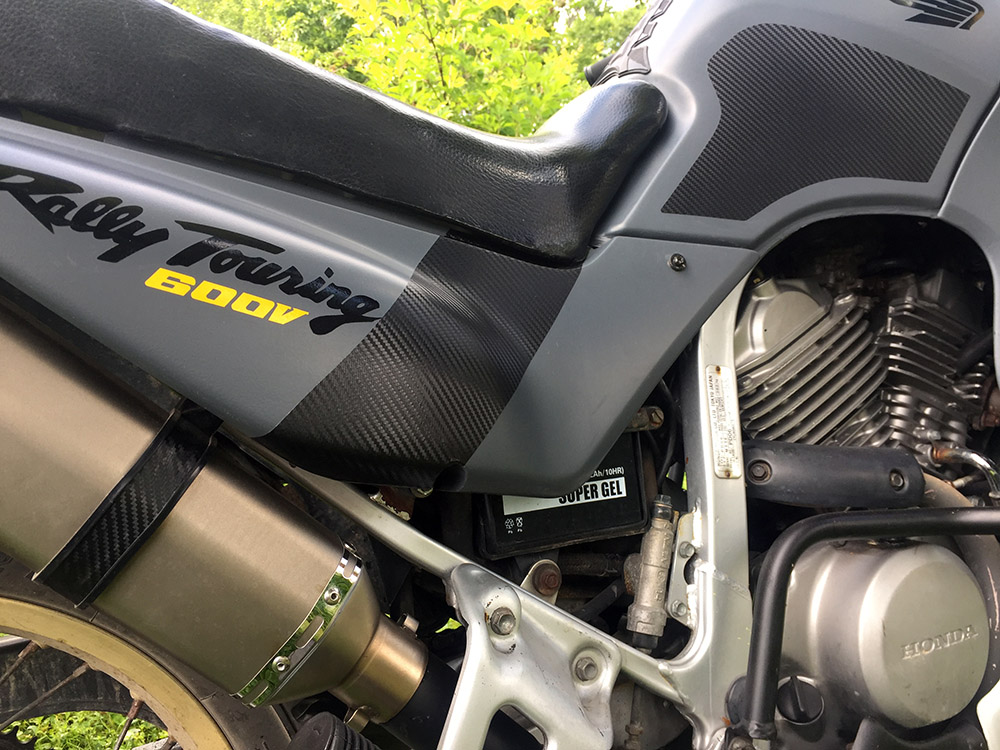
Rear side stickers and carbon fiber protection film where passenger rubs knees. The carbon fiber film can easily be stretched over the uneven surface if heated with a hairdryer.
Painting the handguards
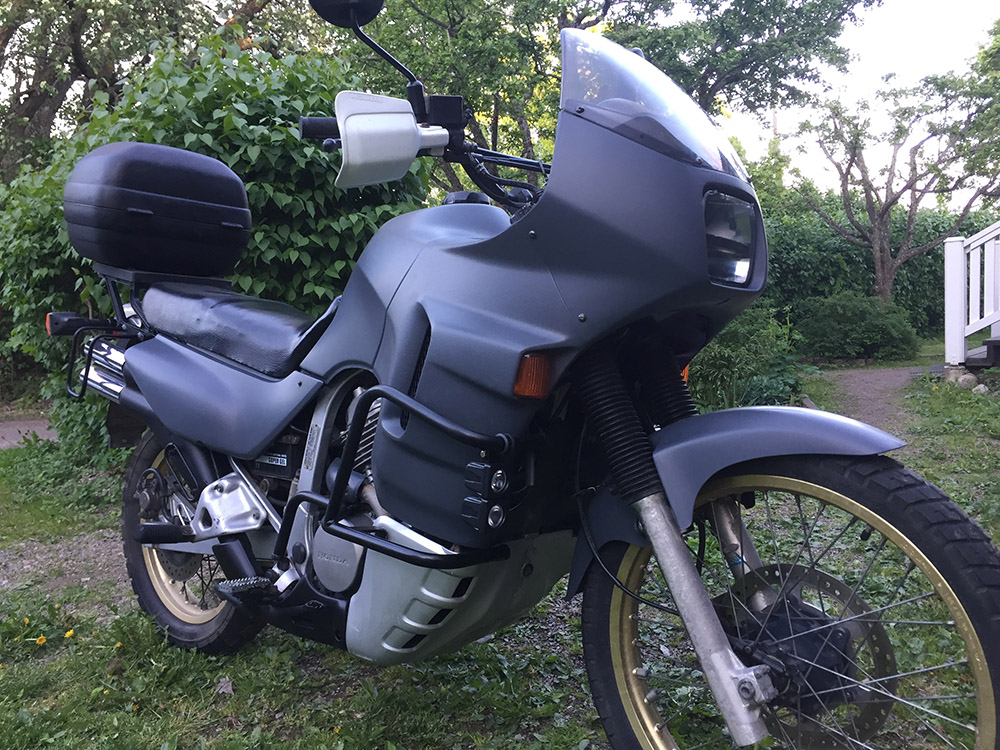
Now with the whole motorcycle was grey/black, the white handguards seemed quite off. So I sprayed them with a plastic primer and painted them yellow. it gave a nice contrast and added lots of visibility on the road.
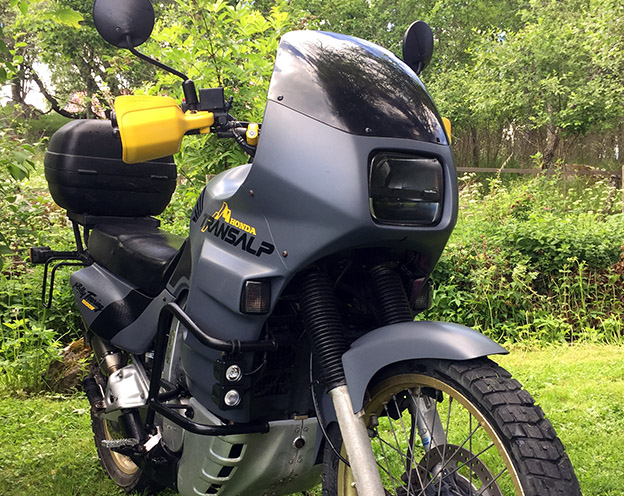
The handguards painted yellow. Great visibility and increased safety on the road. Here you also see the smoked turn indicators.
LED headlight upgrade
You have probably noticed by now that I upgraded the dull original headlight to a really cool LED headlight fitting the Transalp. It is really easy to install. You simply remove the front cowl, remove the old headlight, put in the new one in the original frame, and connect it to the original connector. Done in 10-15 minutes.
Don’t you just love the cool dark look of that headlight!
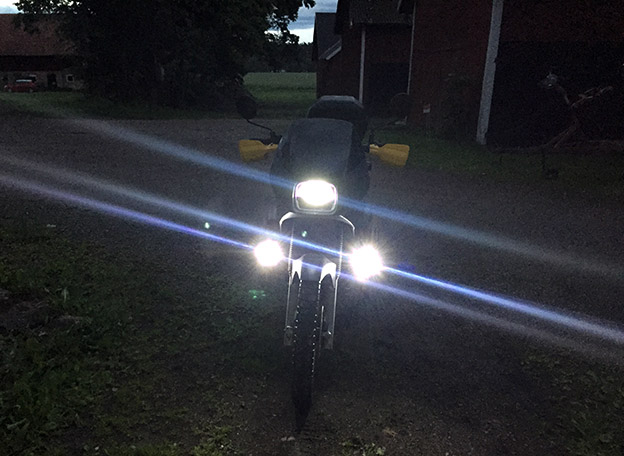
LED Daytime Running Lights and auxiliary lights

Three light spots instead of one is proven to dramatically increase visibility and helps the brain to determine distance to the vehicle much easier. A well worth safety investment.
To increase the visibility and safety, I have mounted DRLs (Daytime Running Lights).
I chose a type that can be pair-mounted (makes two units like one unit). The upper lamp is a DRL (used together with low beam in daylight) with 30 degrees beam pattern. The lower lamp has a wider beam (60 degrees) and is connected to the high beam to run at night.
Get the DRL here and the auxiliary lights here.
Here’s what the DRL’s look in daytime.
Actually, they’re only supposed to run at daytime.
Anyhow, here’s what they look like in the evening:
And here’s when I switch to high beam, which includes the auxiliary LED lights:
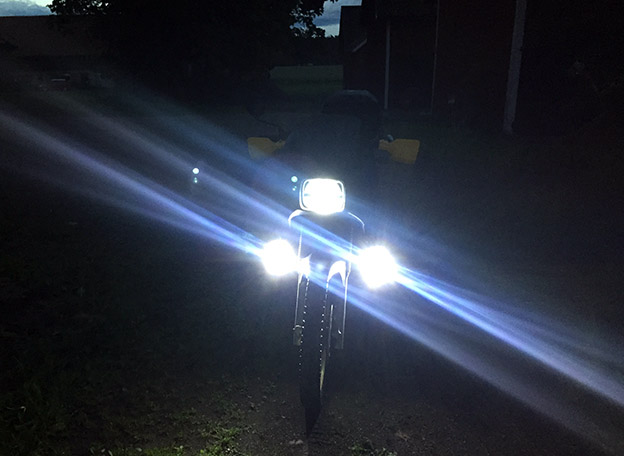
As you can see, my smartphone camera compensates for the increased light intensity (the sourroundings looks darker)
I can say that my bike is quite visible now.
Here’s a video that gives an idea of the different beams, starting with only headlight low beam, then adding DRLs, and finally switching to high beam including the auxiliary LEDs:
As you can see, I have directed the DRL beams quite low, in order not to dazzle meeting traffic.
Let me hear what you think of my Transalp’s transformation. Do you have a Transalp? Any fun modifications?
Looking forward to hear from you. Chers!


Hi,
Your Transalp looks great!
Where did you get the carbon fiber protection film?
Awesome job!
So how does the plastidip hold up so far?
Greetings from the Netherlands,
Dirk
Thanks Maurice! I just bought it at a local car accessories store
Thank you Dirk! It holds up surprisingly well so far. But it has been only a year and I haven’t been driving excessively. Going for a long trip from north of Sweden to Croatia this summer, so then it will really be tested 🙂
Hey there!
Really like your make over, nice work!
I was wondering where you got the smoked lens indicator lights?
The replacement headlight looks like it’s black inside. Is that correct? It seems counter intuitive to have a black reflector. Shouldn’t it be a mirror like surface.
Thanks 🙂 I think it was on eBay. The lamp bulb in it was very weak though, so I have replaced it with LED. I recommend these if you just need som smaller turn indicators https://transalpled.eu/shop/mounting/smaller-turn-indicator/
It just looks black because of the piece that divides the upper and lower part and where the LEDs are mounted, is black. The reflector reflects the black part. The reflector itself is of course like a mirror surface.
Hey
Verry nice! I’m planning spraying my transalp. This plastidip is Verry interesting. I think I will try this. Wrap was my first option but the color I want (ral 7000 mat) is not available.
Thanks for sharing this, I let you know the result. Greetsz Ineke
Love what you’ve done with the bike!
Looking for a new bike and the transalp really intrests me, so this is a nice inspiration!
Have you thought about mounting a high front fender?
Thanks! Yes, I’ve been thinking about that. Not sure if it is more effective though 🙂
Very nice build! Could you let me know where you got the smoked front turn indicators? Cant find them anywhere 🙁
Hi Wesley! Thanks! I bought the front turn signals here
Nice work! The bike looks great.
The link for the LED lights doesn’t work anymore 🙁 Who makes those auxillary LED lamps?
Thanks! I don’t know where to buy them now, but I have a used one in good shape for sale. I will send you an email /Niclas
Hi, the bike looks great with the extra lightning !
Any update on the plasti dip ? Did it last 2 years ?
Thanks! Yes, it still looks fine. But now I’m tired of it so I will remove it and this time try foil 🙂
Looks fantastic! Can you please share all the costs for repainting it, etc? I had never heard of Plasti Dip, is it that cheap to do it?
Send me a few links of the sprays you used as well, please, I’d like to compare them with what I can find here in Bulgaria.
I’m considering to repaint mine at some point as well. What do you mean with your last comment that you’ll try foil?
North of Sweden sounds awesome, man. Ha det bra!
Sorry for the late reply. This is the spray I used https://plastidip.se/produkt/plasti-dip-spray-gun-metal-grey/
With “foil” I mean wrapping it with vinyl foil. I have bought from here, but not done the wrap yet https://www.vnvinyls.se/category/camo-vinyler
Good luck with yours!
Hi, what front indicator do you have? Very nice! These are smoked version but can’t find them anywhere. Thx!
Hi, your link for lamp mod isn’t working anymore!!
I believe I found them on Ebay
Yes. The webshop is closed. I do have one lamp for sale. It has been mounted for a short while. Condition is very good.
Hey Joomla,
Such a nice bike and what a headlight! Could I maybe buy your lamp wich is for sale?
Kind regards,
Colin
Thanks. Yes, I have one lamp for sale. I will write you an email.
What protection bars are you using here?
The bars were there when I bought the bike, so I have no idea.